Design Tips

Over the course of the next several days you will receive tips on how to give any room in your home a professional looking makeover that will be sure to impress your friends! Our example is a living room since most folks see this space first when they walk in the door.

Before Pictures

start with open space

LR 1 before

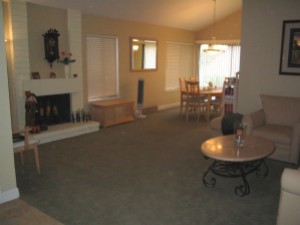
The first step is to clear out the space as much as possible giving yourself a clean slate to re-create the room.  Then decide what you want to keep in the room in order for it to function properly for you. Keep in mind you will re-build the space starting with the largest furniture pieces, placing them in such a way to provide for traffic flow, conversation, access to a view (possibly) and room balance. Tomorrow we will start pulling together this cleared out space!

For more information on One-day Room Makeovers visit:  http://www.ReStyleInteriors.net

Design Tips

Creating proper room illumination starts by combining the three different types of light sources; ambient, task and accent or decorative lighting. To distribute the light evenly, place the fixtures so they form a triangular shape throughout the space. For example, if your room already has a ceiling fixture that is considered general illumination or ambient lighting. Next layer the room with side lamps or a floor lamp positioned around the primary and secondary seating areas for task lighting. Then follow-up with accent lighting to feature artwork, tall plants or other focal points in the room.

Creative Alternatives to Basic Lighting:

  • Elevate a lamp on large hardbound books for added interest and height.
  • Use up-lights behind trees, plants, or open shelving.
  • Use candles in a grouping where there is no electrical alternative or to dress up a non-functioning fireplace.
  • In a low-light situation, use a mirror to reflect every bit of available light.
Design Tips

When choosing a new chandelier, numbers play an important role. Use the numbers here to help you decide what is right for your room.

  • If the room is smaller than 10′ by 10′, a 17″ to 20″ diameter chandelier would be the right size.
  • If the room is about 12′ x 12′, a 26″ or 27″ chandelier would look right.
  • If the room is about 14′ x 14′, choose a 24″ to 36″ chandelier.
  • A chandelier should hang about 30″ from the surface of the table to insure no bumped heads and good illumination.
  • A chandelier should be about 12″ narrower than the width of the table over which it hangs.
  • Total wattage of all bulbs should be 200 to 400 to provide sufficient light
Design Tips

When lighting a bathroom the first and most important focus should be on the vanity lighting. Ideally a vertical fixture should be hung on either side of the mirror. This allows for light to be evenly distributed across one’s face. The fixtures should be mounted approximately 5.5 feet above the floor (eye level), and 36-40 inches apart. This helps to eliminate shadows under the eyes and chin.

Wall Sconces
Wall Sconces
Design Tips

Mis-matched chairs
Mis-matched chairs

  Before, this family room lacked a cohesive look.After changing out the mis-matched chairs with a pair of citron striped slipper chairs this room now has that tied together designer look. Tip of the day:Sometimes the most simple changes can add huge impact!  

Updated Slipper Chairs Add Charm
Design Tips

Have you ever heard of Etsy? It’s a wonderful online shopping site where creative people sell their handmade goods. I found this fabulous  jewelry organizer made out of a repurposed picture frame. What a great idea!

You can personalize any frame  to fit your style and color scheme.

http://www.etsy.com
http://www.etsy.com
Design Tips

When it comes to DIY projects, some of the most simple ideas can literally re-define a space. If your bedroom is dull and drab, maybe what you need is a new headboard to take your style up a notch!  HGTV has some great suggestions for creating your own headboard without breaking the bank.  Check out these photos…

Click here:http://www.hgtv.com/bedrooms/budget-friendly-headboards/pictures/index.html?nl=HGI_062613_featlink1&sni_mid=84977&sni_rid=84977.324.842218&c32={179665AE-9F3E-4B41-A6E7-03103C191E26}

Design Tips

Okay, let me first qualify this statement by saying, any budget minded creative design project starts with using what you already have.  That being said, I got my design inspiration for these drapery panels after finding a 100% cotton shower curtain marked down to $4.24! After looking through my remnant fabrics, I found the perfect complimentary color to accommodate my window length.  Note: standard shower curtains are  72″ x 72″. 

Step 1: I re-purposed a bamboo pole by cutting it down to form the drapery hardware and attached them to the wall with standard “L” brackets from my tool box. 

Step 2: I simply cut the shower curtain in half and sewed the solid fabric to the bottom. Note: use fusible iron on tape if you don’t have a sewing machine.  Turn under and either sew or tape  the raw side seam and bottom hem.

Step 3: I hung the curtain on the bamboo rod using drapery ring clips I already had.

Step 4: Enjoy!